Connect Stripe to Your Organization
Set up payments so your organization can receive donations directly.
Connect Stripe to Your Organization
Set up Stripe Connect so donations flow directly to your organization's bank account.
Overview
Before your organization can receive donations, you need to connect a Stripe account. Stripe handles all payment processing and deposits funds directly to your linked bank account.
There are two paths to start accepting donations:
-
Connect Stripe now — The standard path. Complete Stripe Connect, then start collecting. Funds deposit on Stripe's payout schedule.
-
Interim collection (eligible organizations only) — If your organization qualifies, you may see an option in Settings to appoint MonthFund as your limited payment agent. This lets you start collecting donations before Stripe Connect is complete. MonthFund holds those funds until you finish Connect, then releases them.
Note: Personal (individual) fundraisers must connect their own Stripe account before accepting gifts. The interim collection option is only available for eligible organization workspaces.
Step 1: Open your Stripe settings
- Log in to your org hub dashboard.
- Go to Settings in the sidebar, or use Quick Actions → Payments on the dashboard home.
- Scroll to the Stripe section.

Step 2: Choose your connection method
You have two options:
Option A: Use my existing Stripe account
Best if your organization already has a Stripe account, especially one with nonprofit pricing.
- Click Use my existing Stripe account.
- You'll be redirected to Stripe to authorize the connection.
- Log in to your existing Stripe account if prompted.
- Approve the connection.
- You'll be redirected back to MonthFund with your account linked.
Option B: Set up a new account for this platform
Best if you want a dedicated Stripe account for your MonthFund fundraising.
- Click Set up a new account for this platform.
- A Stripe onboarding window opens.
- Complete the required information (see Step 3).
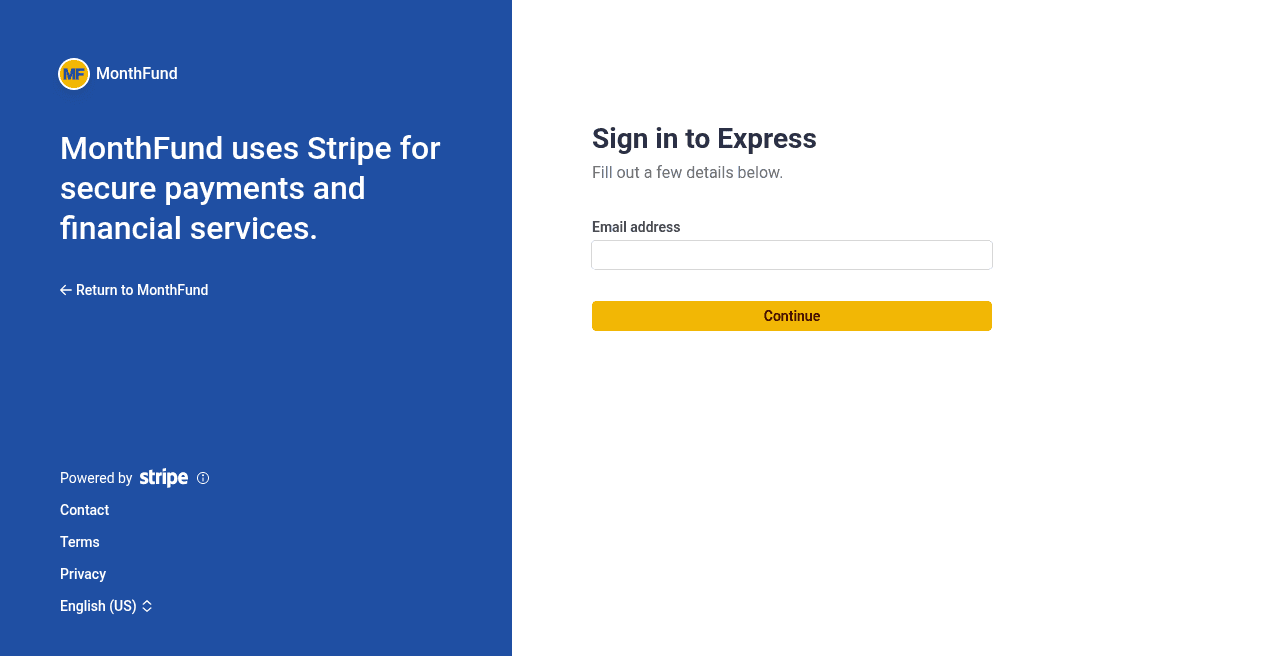
Step 3: Complete Stripe onboarding
If you chose Option B, you'll need to provide:
Business information:
- Legal business name
- Business type (nonprofit, sole proprietor, etc.)
- Tax ID or EIN
Business owner information:
- Full legal name
- Date of birth
- Home address
- Social Security Number (for US organizations)
Bank account details:
- Bank routing number
- Account number
Verification documents (may be required):
- Business license
- Government-issued ID
- Proof of address
Tip: Have these documents ready before you start. Most organizations complete onboarding in 10–15 minutes.
Step 4: Verify your connection status
After completing onboarding:
- Return to Settings → Stripe in your MonthFund dashboard.
- Your status should show Connected or Fully onboarded.
- Click Manage in Stripe Dashboard to access your full Stripe account.
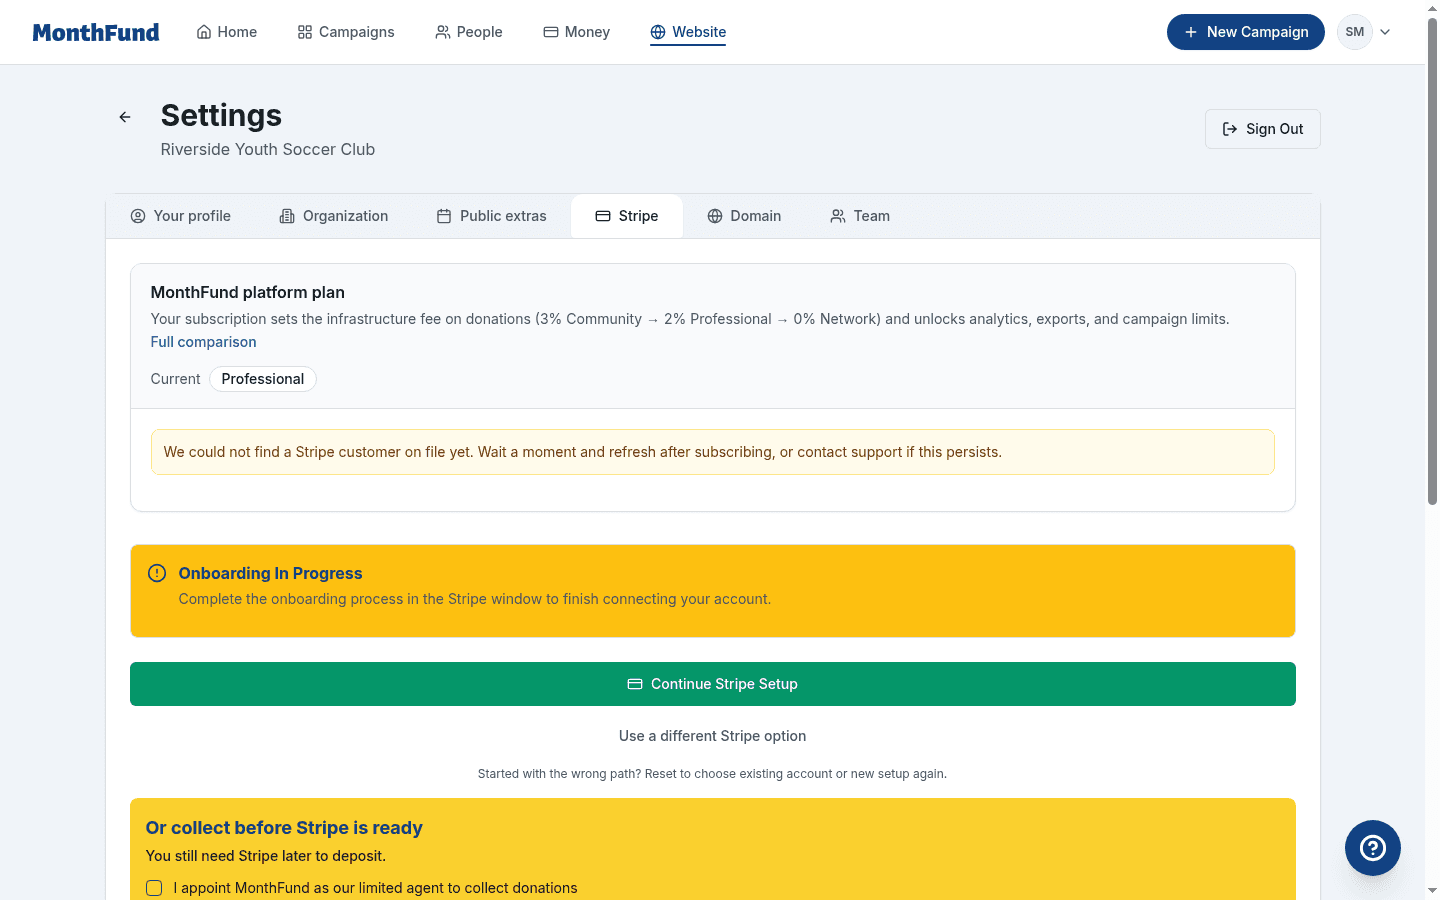
Status meanings:
- Not connected — No Stripe account linked yet
- Onboarding in progress — Account created but verification incomplete
- Connected / Fully onboarded — Ready to accept donations
Step 5: Apply for nonprofit pricing (if applicable)
Stripe offers discounted rates for registered nonprofits. This is not automatic — you must apply separately.
- Click Manage in Stripe Dashboard in your MonthFund Settings.
- Contact Stripe Support from within your dashboard.
- Provide your IRS 501(c)(3) determination letter or tax-exempt documentation.
- Stripe reviews and applies discounted rates within 1–3 business days.
Standard rates: 2.9% + $0.30 per transaction Nonprofit rates: 2.2% + $0.30 per transaction (varies by region)
Understanding fees
MonthFund fees and Stripe processing fees are separate:
MonthFund infrastructure fees (by plan)
| Plan | Infrastructure fee |
|---|---|
| Community (free) | 3% |
| Professional ($49/mo) | 2% |
| Network ($199/mo) | 0% |
Stripe processing fees
- Standard: 2.9% + $0.30 per transaction
- Nonprofit: 2.2% + $0.30 per transaction
Fee coverage at checkout
Donors can choose to cover fees when they give, so your organization receives the full intended gift amount. This option appears on the checkout page.
Example: A donor claims Day 15 ($15) and chooses to cover fees. They pay approximately $16.20, and your organization receives the full $15.
Interim collection (when Stripe Connect is incomplete)
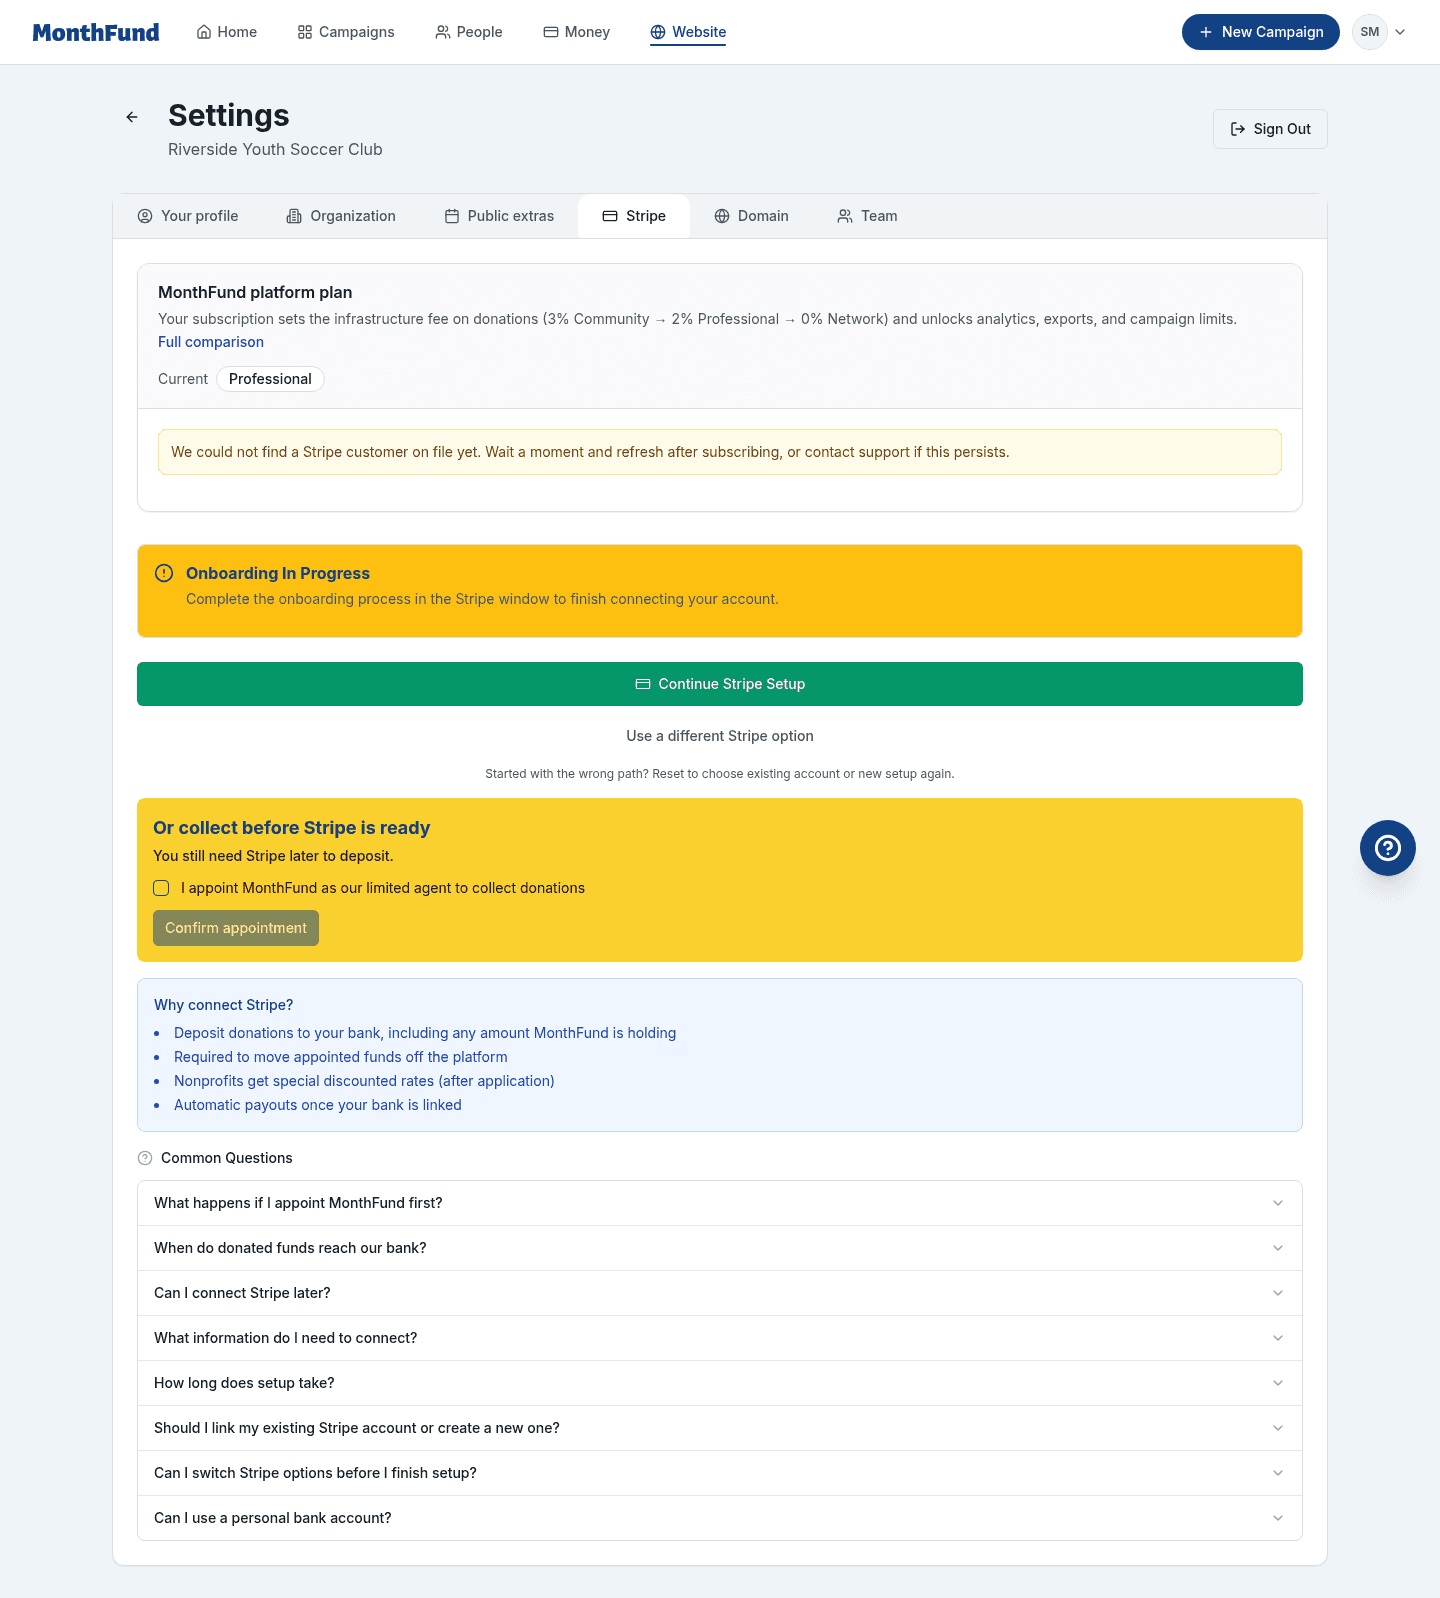
Some eligible organization workspaces may see an option in Settings to appoint MonthFund as a limited payment agent.
When this option appears
This option is available only for:
- Organization workspaces (not personal fundraisers)
- Eligible organizations as determined by MonthFund
How it works
- In Settings → Stripe, you may see an option to enable interim collection.
- Accept the appointment by reviewing and confirming the terms.
- Your campaign can start accepting donations immediately.
- MonthFund holds those funds securely until you complete Stripe Connect.
- Once Connect is finished and payouts are ready, the held funds transfer to your account.
Important notes
- You still need to complete Stripe Connect. Interim collection is a bridge, not a replacement. Funds cannot be deposited to your bank until Connect is complete.
- Held funds have a time limit. Complete Stripe Connect promptly to claim your funds.
- Personal fundraisers cannot use interim collection. Individual fundraisers must connect Stripe before accepting gifts.
When will I receive payouts?
After your first donation:
- Stripe initiates the first payout within 2–7 business days.
- Subsequent payouts follow your payout schedule (daily, weekly, or monthly).
- Set your payout schedule in your Stripe Dashboard.
For interim collection: Funds remain held until you complete Stripe Connect. Once connected, transfers process according to Stripe's schedule.
Troubleshooting
My status is stuck on "Onboarding in progress"
Stripe may need additional verification. Check your email for messages from Stripe, or log in to your Stripe Dashboard to see what's required.
I can't find the interim collection option
This option is only available for eligible organization workspaces. If you don't see it, proceed with standard Stripe Connect. Contact support if you believe your organization should qualify.
Donations are failing even though I'm connected
- Confirm your Stripe status shows Connected (not just "Onboarding in progress").
- Check that your Stripe account is not restricted — log in to Stripe Dashboard to verify.
- Ensure your bank account details are correct in Stripe.
I want to change my connected Stripe account
For OAuth (existing account): Disconnect the platform from your Stripe Dashboard, then reconnect a different account from MonthFund Settings.
For Express (new account): Contact MonthFund support to reset your connection.
Next steps
Once Stripe is connected:
- Review your campaign — Confirm the month, goal, and public story are ready.
- Invite fundraisers — Add community fundraisers to carry personal calendars. See Invite Fundraisers to Your Campaign.
- Share your org hub — Let supporters find your campaign.
Related resources
Questions? Visit the Help Center or contact support.